 | English
| Deutsch
SR1 / SR1+: M-alpha diagram incl. loosening torque

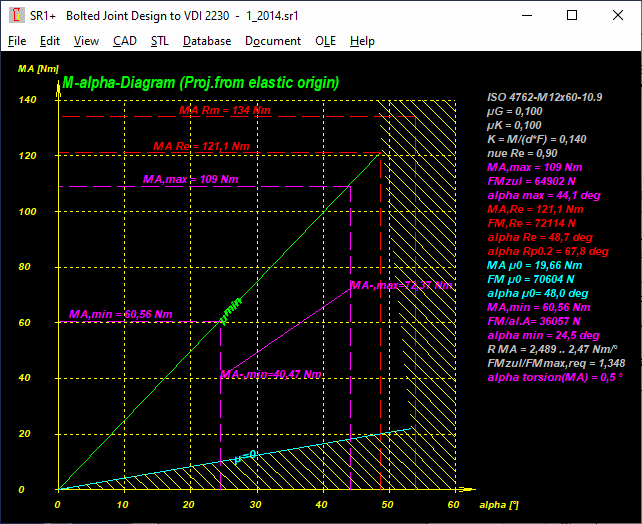
The tightening torque is MA= head friction MK + thread torque MG. The thread torque consists of a proportion of thread friction and thread pitch (MG=MGfriction+MPitch. When loosening the screw, MP (thread pitch) acts in the opposite direction,
The loosening torque is thus
MA- = MK + MGfriction - MP
or
MA- = MA – 2 * MP.
(with MK + MGfriction = MA - MP)
MP(max) relates to the maximum clamping force FMzul at an alphamax angle of rotation. For alphamin, MPmin=MPmax/alphaA. The loosening torque is MA-,max = MA,max - 2*MPmax and MA-,min = MA,min - 2*MPmin.
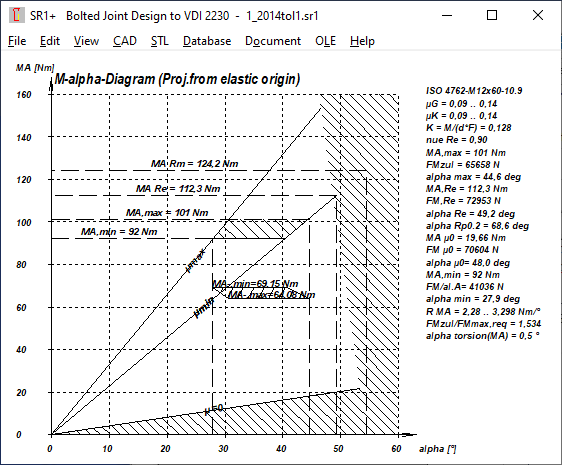
If a tolerance is defined for the friction, there is a tolerance field for the tightening torque as well as for the loosening torque.
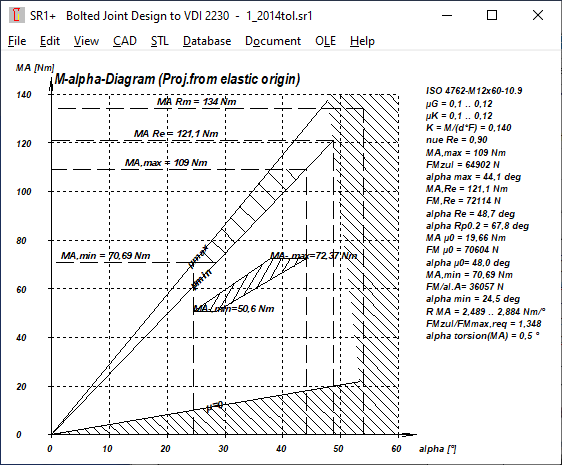
If there is a large friction tolerance and a small tightening torque tolerance, MA-,min can also be greater than MA-,max.
SR1+: Share of head friction, thread friction, thread pitch in the tightening torque
The share of head friction MK and thread torque MG in the tightening torque MA(max) have beeen added to the printout (MA=MK+MG).
The thread torque is made up of thread friction and thread pitch (MG=MP+MGfriction)
       ASSEMBLY (tightening torque)

       ======================================================================

       Yield point tightening factor     nue Re                   0,90

       ----------------------------------------------------------------------

       Tightening factor                 alpha A                  1,80

       ----------------------------------------------------------------------

       Dispersion of assembly load       Tol FM   %               28,6

       ----------------------------------------------------------------------

       tightening procedure: bolt driven

       ----------------------------------------------------------------------

       Tightening torque MA              MA,max   Nm               109

       ----------------------------------------------------------------------

       Tightening torque                 MA,min   Nm             60,56

       ----------------------------------------------------------------------

       Tightening torque                 MA,nom   Nm             84,78

       ----------------------------------------------------------------------

       Tolerance tightening torque       Tol MA   %               28,6

       ----------------------------------------------------------------------

       Loosening torque (al.max)         MA-,max  Nm             72,37

       ----------------------------------------------------------------------

       Loosening torque (al.min)         MA-,min  Nm             40,47

       ----------------------------------------------------------------------

       Tightening torque f yield point   MA,Re    Nm             121,1

       ----------------------------------------------------------------------

       Tightening torque fracture        MA,Rm    Nm               134

       ----------------------------------------------------------------------

       Tightening angle                  al.max   deg             44,1

       ----------------------------------------------------------------------

       Tightening angle                  al.min   deg             24,5

       ----------------------------------------------------------------------

       Rate for tightening torque min    RMAmin   Nm/deg         2,489

       ----------------------------------------------------------------------

       Rate for tightening torque max    RMAmax   Nm/deg          2,47

       ----------------------------------------------------------------------

       Rate for prestressing load        R FM     N/deg           1471

       ----------------------------------------------------------------------

       Torsion bolt at MA,max            al.tors  deg              0,5

       ----------------------------------------------------------------------

       Head friction torque MK=46% MA    MK       Nm             49,86

       ----------------------------------------------------------------------

       Thread torque MG=54% MA           MG       Nm             58,79

       ----------------------------------------------------------------------

       Pitch torque MP=31% MG            MP       Nm             18,08

       ----------------------------------------------------------------------

       Thread friction torque MGf=69% MG MGf      Nm             40,72

       ----------------------------------------------------------------------

       Mean friction diameter (B)        dkm      mm             15,37

       ----------------------------------------------------------------------
Overview of spline standards (www.hexagon.de/splines.htm)
Since there is always a question as to which software is suitable for which standard, an overview has been created. If there is no special software for the standard you are looking for, you can at least calculate the tooth profile with WNXE for involute tooth flanks or WNXK for serrations with straight tooth flanks (or ZARXP for gears). With WNXE, WNXK and ZARXP, however, you first have to look up the most important dimensions in the standard, while with the other programs you simply select the size and tolerance zone.
|
Spline Standard |
Spline Type |
Note |
Software |
|
ISO 4156 |
Involute Splines |
2021 |
|
|
ISO 14 |
Straight Sided Splines |
1986 |
|
|
ISO 500 |
Straight Sided Splines |
DIN 9611 |
|
|
ANSI B92.1 |
Involute Splines |
1996 |
|
|
ANSI B92.2M |
Involute Splines |
ISO 4156 |
|
|
DIN 5480 |
Involute Splines |
2006 |
|
|
DIN 5481 |
Serration Splines |
2019 |
|
|
DIN 5482 |
Involute Splines |
1973, withdrawn |
|
|
DIN 9611 |
Straight Sided Splines |
ISO 500 |
|
|
SAE J498 |
Involute Splines |
ANSI B92.1 |
|
|
BS 3550 |
Involute Splines |
ANSI B92.1 |
|
|
BS 6186 |
Involute Splines |
ISO 4156 |
|
|
E22-141 |
Involute Splines |
155, 20 deg |
|
|
E22-144 |
Involute Splines |
ISO 4156 |
|
|
E22-145 |
Involute Splines |
ISO 4156 |
|
|
JIS B 1602 |
Involute Splines |
1961, 45 deg |
|
|
JIS B 1603 |
Involute Splines |
ISO 4156:1981, D2001 |
|
|
JIS D 2001 |
Involute Splines |
1959, withdrawn |
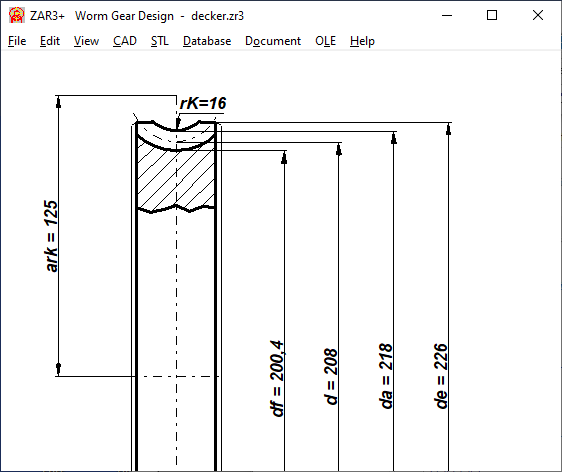
ZAR3+: Center distance "a rk"
The distance between the center of the wheel and the fillet radius is now dimensioned in the production drawing
