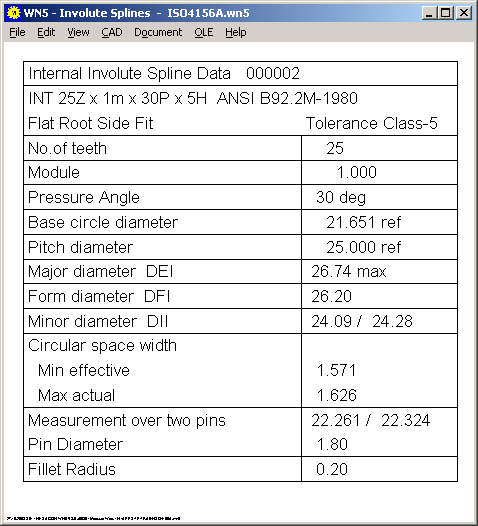
WN5 - Involute Splines according to ISO 4156
Calculation of involute splines to ISO 4156 (2005) is equal with ANSI B92.2M of 1980. The only difference seems to be the reduced tolerance of the tip diameter ("Major Diameter" on external spline and "Minor Diameter" at internal spline): ISO tolerance h10, h111, h12 or H10, H11, H12 depending on module.
Updated version of WN5 lets you select calculation according to ANSI B92.2M or ISO 4156. Default setting is now ISO 4156. Depending on your selection, WN5 draws at "View->Quick" and "View->Table" a data table according to ANSI B92.2M or ISO 4156.

Data table according to ISO 4156 is new in WN5 V3.0.
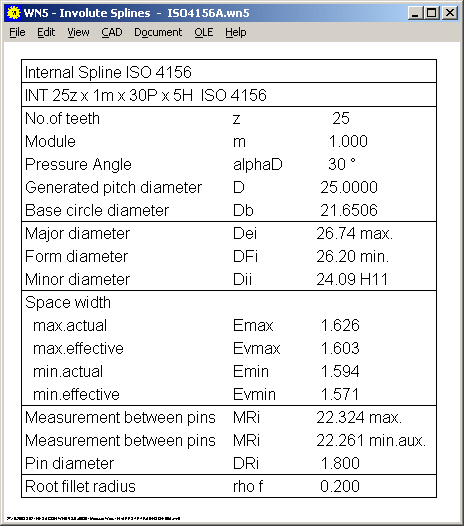
Tooth clearance "maximum effective clearance cvmax" and "minimum effective clearance cvmin" according to ISO 4156 has been added at "View->Printout"
Comparison of Tooth Thickness Tolerances to ISO 4156 (WN5) and DIN 5480 (WN2)
Tolerance class and tolerance position can be selected separate for internal spline and external spline in DIN 5480. In ISO 4156, tolerance class of internal and external spline are equal, and tolerance position of internal spline is always "H". Tooth thickness tolerances calculated from selected ISO tolerance are not comparable between DIN 5480 and ISO 4156, the calculation is completely different. Example: Tooth thickness tolerance of a spline "INT/EXT 25z x 1m x 30R x 6H/6e - ISO 4156" is about 400% more than that of a similar "DIN 5480 - 27 x 1 x 26 x 6H 6e".
Tolerance class 6 in ISO 4156 is approximately equivalent with tolerance class 9 in DIN 5480.
WN5 - Tolerance Graphic Tooth Thickness / Tooth Gap
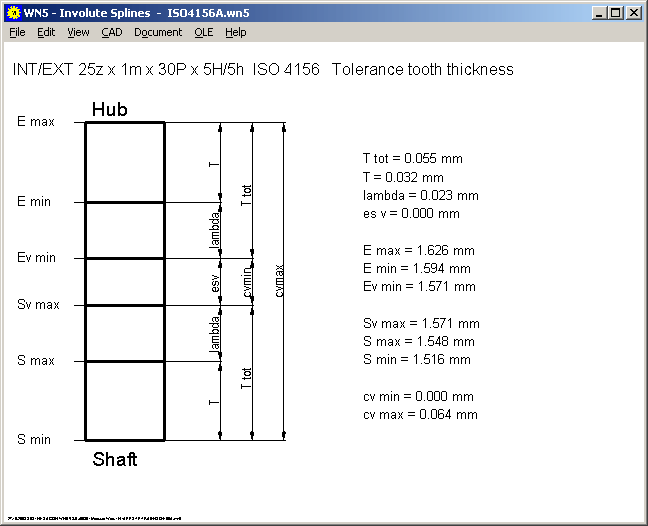
A new tolerance graphic in WN5 shows the relation between tolerances and measurement dimensions on tooth thickness and tooth gap to ISO 4156 / ANSI B92.2M.
WN2 - Designations according to DIN 5480:2006
With the latest release of DIN 5480, some designations have been changed and adopted to ISO vocables:
|
Old |
New |
|
Upper tooth thickness deviation full-measured |
deviation |
|
Tooth thickness tolerance T |
Total tolerance TG |
|
Tolerance at single-measurement TE |
Tolerance actual Tact |
|
Difference T-TE |
Tolerance effective Teff (=TG-Tact) |
|
Dimension over pins min. |
Measurement over pins min. effective |
|
Dimension over pins max. single-measur. |
Measurement over pins max. actual Ref. |
|
Dimension over pins max. full-measured |
Measurement over pins max. actual |
|
Tooth thickness max: sn max. |
Tooth thickness max.effective: svmax |
|
Tooth thickness min: sn min. |
Tooth thickness min.actual: smin |
|
- |
Tooth thickness max.actual Ref: smax |
Printout of WN2 / WN2+ has been modified with the new designations.
"Upper tooth thickness deviation single-measured" and "Lower tooth thickness deviation" are no longer printed, but "Tolerance actual" Tact (= TG - Teff) instead.
Printout now lists tooth thickness dimensions only for external spline and tooth gap dimensions for internal spline only.
Minimum interference util. cfmin and tooth form diameter dFf have been added in the printout.
As tooth root diameter, only nominal diameter df and tolerance to DIN 5480 are listed now in the printout. In earlier versions, also tooth root diameter df and tolerance Adf depending on tooth thickness tolerances were printed. These dimensions are now listed at "Addendum Modification Coefficients" as df (xemax) und df (xemin).
WN2 - Table to DIN 5480:1991 and DIN 5480:2006
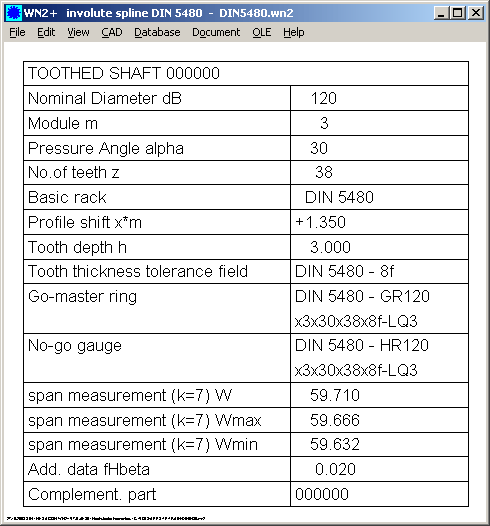
Old DIN 5480:1991 refers to go-master ring and no-go gauge and span width for external splines and measurement between pins for internal spline. Table according to release 2006 of DIN 5480 lists tooth thickness dimensions and measurement over pins.
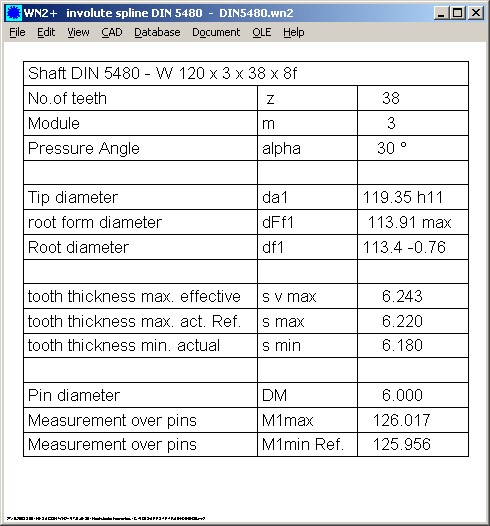
WN2 - Tolerance Graphic Tooth Thickness and Tooth Gap
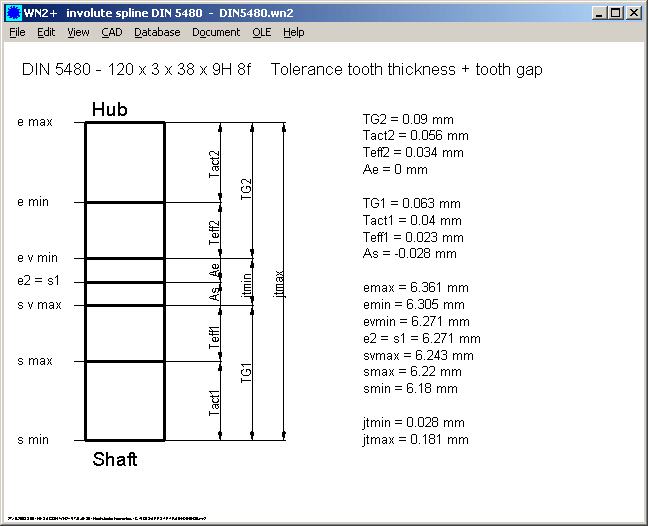
A new tolerance graphic in WN2 shows the relation between tolerances and measurement dimensions on tooth thickness and tooth gap according to DIN 5480:2006.
FED2+, 3+, 5, 6, : Rm = f(d)
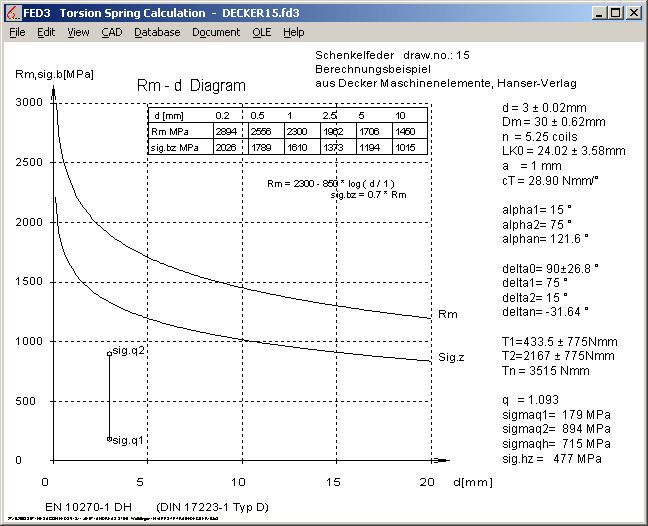
Diagram with tensile strength and permissible bending stress as function of wire diameter was added in FED3+. A table with permissible shear stress and tensile strength for some wire diameters has been added in the equivalent diagrams of FED2+, FED3+, FED5 and FED6.
FED1+ Quick-View with Diameter of Mandrel and Bore
Maximum mandrel diameter Ddmax and minimum bore diameter Dhmax have been added into FED1+ Quick View.
New Prices for Maintenance Contracts
Until now, annual maintenance fee for software maintenance contracts was 15% of a single license. Annual maintenance fee is calculated to another method since 1.10.2008:
150 EUR + 40 EUR per program
Example: Helical spring package: 6 * 40 + 150 = 390 EUR / year
Example FED1+ in German and English version: 2 * 40 + 150 = 230 EUR / year